Introduction
The human shoulder is one of the most flexible and complex joints in the body, relying on a delicate harmony of bones, muscles, tendons, and ligaments to lift, reach, push, and pull. When severe joint degeneration or complex injuries damage this intricate anatomy, even simple daily movements—such as reaching into a cupboard, styling your hair, or finding a comfortable sleeping position—can become sources of persistent pain.Navigating healthcare choices empowers you to make well-informed decisions for your joint health. For reliable hospital discovery tools, educational resources, and orthopedic guides, BESTORTHOHOSPITALS provides valuable information to help you locate qualified surgical facilities and understand advanced joint replacement procedures.
What Is Shoulder Replacement Surgery?
Shoulder replacement surgery, clinically termed shoulder arthroplasty, is an orthopedic procedure in which damaged, arthritic, or fractured bone and cartilage surfaces of the shoulder joint are surgically removed and replaced with artificial prosthetic components made of medical-grade metal alloys and durable polyethylene plastics.
Anatomical Configurations of Shoulder Arthroplasty
 ├── Total Shoulder Arthroplasty (Anatomic TSA)
 │    ├── Replaces humerus head with prosthetic metal ball
 │    ├── Replaces glenoid socket with smooth plastic cup
 │    └── Requires intact, functional rotator cuff muscles
 └── Reverse Shoulder Arthroplasty (RSA)
      ├── Reverses natural ball-and-socket positions
      ├── Attaches prosthetic ball (glenosphere) to glenoid socket
      ├── Attaches prosthetic cup to the top of humerus bone
      └── Relies on the deltoid muscle rather than damaged rotator cuff
The natural shoulder joint is a ball-and-socket mechanism formed by the rounded top of the upper arm bone (humeral head) fitting into a shallow socket (glenoid) in the shoulder blade. Orthopedic surgeons utilize two primary joint replacement configurations based on the structural condition of your surrounding muscles and tendons:
Anatomical Total Shoulder Replacement
In a standard total shoulder replacement, the artificial components replicate the natural anatomy of the joint. The surgeon places a metallic ball onto the top of the humerus and secures a smooth, plastic socket cup onto the glenoid. This procedure is generally recommended when the surrounding rotator cuff tendons remain healthy and functional.
Reverse Shoulder Replacement
When a patient presents with severe rotator cuff tears, cuff tear arthropathy, or failed previous shoulder surgeries, an anatomical replacement may not function properly. In a reverse shoulder replacement, the positions of the ball and socket are switched: a metal ball is attached to the shoulder blade socket, while a plastic cup is secured to the top of the upper arm bone. This reverse geometry allows the larger, stronger deltoid muscle to lift the arm instead of relying on compromised rotator cuff tendons.
The primary goals of both surgical approaches are to relieve persistent joint pain, restore functional range of motion, and enhance overall quality of life.
Who May Need Shoulder Replacement Surgery?
Orthopedic surgeons consider shoulder replacement for individuals who experience chronic, debilitating shoulder symptoms that have failed to improve following conservative treatments such as oral medications, physical therapy, corticosteroid injections, or lifestyle modifications.
- Severe Osteoarthritis: Degenerative “wear-and-tear” joint disease that gradually erodes protective cartilage, leading to painful bone-on-bone friction, stiffness, and reduced joint clearance.
- Rheumatoid Arthritis: A chronic autoimmune inflammatory condition that causes joint lining inflammation, cartilage loss, and progressive structural bone damage.
- Rotator Cuff Tear Arthropathy: Advanced joint degeneration caused by long-standing, massive rotator cuff tendon tears that allow the upper arm bone to shift out of alignment and wear abnormally against adjacent bones.
- Complex Proximal Humerus Fractures: Severe, displaced, or shattered fractures at the top of the upper arm bone that cannot be repaired effectively with metal plates and screws.
- Avascular Necrosis (Osteonecrosis): A condition in which blood supply to the upper arm bone head is disrupted, causing bone cells to die and the joint surface to collapse.
- Chronic Disruptive Shoulder Pain: Severe pain that limits basic daily activities—such as dressing, cooking, or lifting—and consistently disrupts sleep despite conservative medical management.
Preoperative Evaluation
Before clearing a patient for joint replacement, the medical team conducts a thorough preoperative evaluation to confirm physical fitness for surgery and anesthesia, as well as to plan the procedure accurately.
Comprehensive Orthopedic Evaluation Pathway
 ├── Physical & Structural Diagnostic
 │    ├── Comprehensive Medical & Surgical History Review
 │    ├── Detailed Physical Examination of Shoulder & Neck Range
 │    └── High-Resolution X-Rays & CT Scans (3D Bone Templating)
 ├── Physiological Clearance
 │    ├── Diagnostic Blood Panels (CBC, Metabolic, Coagulation)
 │    ├── Electrocardiogram (ECG) & Cardiac Clearance
 │    └── Medical Specialist Clearance (Cardiology/Endocrinology if needed)
 └── Surgical & Anesthesia Planning
      ├── Anesthesia Evaluation (Nerve block & general anesthesia choice)
      └── Medication Reconciliation (Adjusting blood thinners/supplements)
Physical and Imaging Diagnostics
- Medical History and Physical Examination: The orthopedic surgeon reviews your overall health, past surgeries, active medical conditions, and assesses arm strength, skin integrity, and nerve function in both arms.
- Shoulder X-Rays: Provide high-resolution views of bone alignment, joint space narrowing, bone spurs, and structural deformities.
- CT Scans or MRI Studies: Three-dimensional CT scans are often utilized for advanced surgical planning, allowing surgeons to create custom implant guides or evaluate glenoid bone volume. MRI scans help assess the health of surrounding rotator cuff muscles and soft tissue tendons.
Physiological Medical Clearance
- Blood and Urine Tests: Baseline Complete Blood Count (CBC) checks for anemia or infection, metabolic panels evaluate kidney and liver function, and coagulation studies assess blood clotting ability.
- Electrocardiogram (ECG): Checks heart rhythm and rules out underlying cardiac issues prior to receiving anesthesia.
- Specialist Consultations: Patients with chronic health conditions—such as heart disease, diabetes, or lung conditions—may require formal clearance from their cardiologist, endocrinologist, or pulmonologist.
- Anesthesia Consultation: An anesthesiologist evaluates your airway, reviews past responses to anesthesia, and discusses regional nerve block options that provide targeted post-operative pain relief.
Shoulder Replacement Preparation Checklist Table
The following summary table outlines core preoperative preparation steps and their clinical importance:
| Preparation Step | Clinical Purpose | Expected Patient Benefit |
| Orthopedic & Medical Evaluation | Confirms baseline physical fitness and clears medical risks. | Reduces the likelihood of intraoperative medical complications. |
| Advanced Pre-Op Imaging (X-Ray/CT) | Provides clear visual measurements of joint anatomy. | Enables precise component sizing and accurate implant placement. |
| Medication & Supplement Review | Identifies drugs or supplements that affect bleeding or healing. | Minimizes bleeding risks and prevents dangerous drug interactions. |
| Fasting (NPO) Compliance | Empties stomach contents before anesthesia administration. | Protects the airway and prevents aspiration during surgery. |
| Prehabilitation Exercises | Strengthens surrounding muscles and improves flexibility. | Accelerates post-operative physical therapy and recovery. |
| Home Environment Preparation | Arranges living space for single-arm accessibility. | Prevents fall risks, reduces joint strain, and supports healing. |
| Caregiver Support Plan | Secures assistance for daily tasks during early recovery. | Ensures help with dressing, bathing, meals, and medication. |
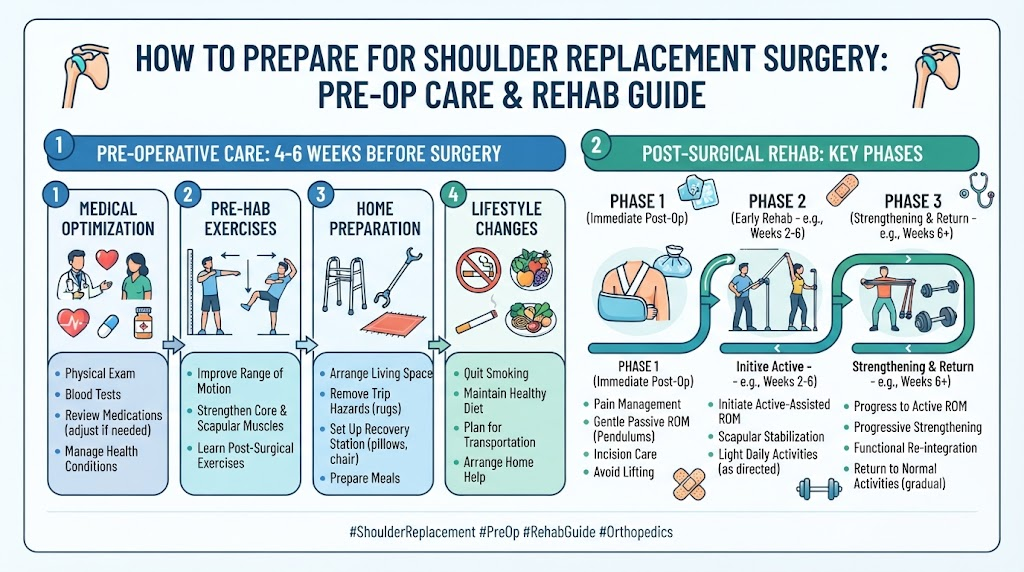
How to Prepare in the Weeks Before Surgery
In the weeks leading up to your joint replacement date, focusing on proactive health habits, physical conditioning, and medication adjustments supports surgical safety and recovery.
Preparation Timeline: Weeks Before Surgery
 ├── 3-4 Weeks Prior: Complete medical clearance, stop smoking, start prehab exercises
 ├── 2-3 Weeks Prior: Review medication lists, arrange caregiver help, stock easy meals
 ├── 1-2 Weeks Prior: Complete lab work/ECG, adjust blood thinners (per doctor), prep home
 └── Days Before: Confirm arrival times, pack loose button-front clothes, rest well
Adhere to Medication Adjustments
Your surgical team will provide explicit instructions regarding which medications to continue and which to pause. Blood-thinning medications (such as warfarin, aspirin, or clopidogrel), nonsteroidal anti-inflammatory drugs (NSAIDs like ibuprofen or naproxen), and specific disease-modifying antirheumatic drugs (DMARDs) must be paused under strict medical supervision prior to surgery to minimize bleeding risks.
Participate in Prehabilitation (Pre-Op Exercises)
Engaging in guided prehabilitation exercises supervised by a physical therapist can significantly improve your recovery trajectory. Prehab focuses on strengthening core muscles, improving shoulder girdle stability within comfort limits, maintaining motion in the un-operated arm, and teaching you how to navigate daily activities using one arm while wearing a sling.
Optimize Nutrition and Eliminate Tobacco
- Nutrition: Eating a balanced, protein-rich diet fortified with vitamins C, D, and zinc supports tissue repair and wound healing.
- Tobacco Cessation: Nicotine severely constricts blood vessels, decreases oxygen delivery to surgical tissues, delays bone integration with the implant, and significantly increases infection risks. Stopping smoking or vaping weeks before surgery improves surgical safety and healing.
Address Dental and Skin Infections
Active bacterial infections anywhere in the body can travel through the bloodstream and settle on new prosthetic joint components. Complete routine dental checkups and treat any active tooth infections, skin cuts, or urinary tract issues prior to your joint replacement.
What to Do the Day Before Surgery
The final 24 hours before your procedure require careful attention to personal hygiene, fasting rules, and logistics.
               ┌───────────────────────────────────────────────┐
               │    Critical Fasting Protocols (NPO Safety)    │
               └───────────────────────┬───────────────────────┘
                                       │
         ┌─────────────────────────────┴─────────────────────────────┐
         ▼                                                           ▼
┌─────────────────────────────────┐                         ┌─────────────────────────────────┐
│       Solid Foods & Dairy       │                         │       Approved Clear Liquids    │
├─────────────────────────────────┤                         ├─────────────────────────────────┤
│• Stop 6 to 8 hours before       │                         │• Only if explicitly approved    │
│  arrival (or per exact orders)  │                         │• Plain water, clear apple juice │
│• Includes candy, mints, & gum   │                         │• Must stop 2 hours prior        │
└─────────────────────────────────┘                         └─────────────────────────────────┘
- Follow Fasting Instructions (NPO Status): Adhere strictly to the dietary cut-off times provided by your surgical team. Consuming solid food, dairy, candy, or chewing gum within the restricted fasting window can force the surgical team to cancel or postpone your procedure to avoid dangerous anesthesia aspiration risks.
- Take Approved Medications Only: If instructed to take essential morning medications (such as cardiac or blood pressure drugs), swallow them with a small sip of water.
- Shower with Antiseptic Cleanser: Wash your body—paying extra attention to the surgical shoulder, armpit, and upper chest—using a specialized chlorhexidine gluconate (CHG) antiseptic soap as directed by your care team. Dry off with a clean towel and avoid applying lotions, deodorants, perfumes, or powders.
- Prepare Clothing and Remove Jewelry: Wear loose-fitting, front-buttoning, or wide-collared shirts that fit easily over a bulk shoulder sling. Remove all jewelry, rings, watches, and body piercings before heading to the surgical center.
- Pack Required Documents: Bring a government ID, insurance cards, medication lists, and advance directives. Leave cash and valuables securely at home.
Preparing Your Home for Recovery
Because your surgical arm will be immobilized in a protective sling for several weeks, arranging your living space prior to surgery is essential for a safe recovery.
Single-Arm Home Safety Adaptation
 ├── Living & Sleeping Areas
 │    ├── Set up a comfortable recliner chair (easier to sleep upright than flat)
 │    ├── Place essential items (phone charger, meds, water) at waist height
 │    └── Remove throw rugs, cords, & clutter from main walking paths
 ├── Kitchen & Meal Preparation
 │    ├── Pre-cook & freeze single-portion meals that require minimal cutting
 │    ├── Place frequently used dishes, cups, & foods on lower counter levels
 │    └── Stock easy-to-open, light food containers
 └── Bathroom & Personal Hygiene
      ├── Install a shower chair & handheld shower head
      ├── Place pump-dispenser soaps & non-skid bath mats
      └── Arrange easy-to-don, front-buttoning clothing
- Set Up a Comfortable Sleeping Area: Sleeping flat on your back after shoulder replacement can place tension on the incision and increase joint pain. Many patients find it significantly more comfortable to sleep in a semi-upright position in a supportive recliner chair, or propped up with wedge pillows in bed, using a small pillow under the elbow to support the surgical arm.
- Re-organize Daily Essentials: Place frequently used items—such as TV remotes, reading glasses, medication logs, phone chargers, and water bottles—on counter surfaces at waist height on the side of your un-operated arm. Avoid reaching above shoulder height or bending low.
- Eliminate Household Fall Hazards: Secure loose wires, remove throw rugs, and clear clutter from hallways and staircases. Ensure all walking paths, stairwells, and bathrooms are well-lit, placing nightlights in key areas.
- Prepare Easy-to-Serve Meals: Pre-cook, portion, and freeze nutritious meals before surgery. Stock easy-to-open containers, lightweight cups, and foods that do not require two hands to cut or prepare.
- Adapt the Bathroom for Safety: Place non-skid rubber mats inside the shower stall. Consider installing a shower bench and a handheld showerhead, which allow you to bathe safely while keeping your surgical arm, sling, and incision site completely dry.
- Arrange Caregiver Assistance: Plan for a family member or friend to stay with you for at least the first several days after returning home to help with dressing, bathing, preparing meals, managing ice applications, and administering medications.
What Happens on Surgery Day?
Knowing what to expect upon arrival at the hospital helps ease anxiety as you move through admissions and surgical preparation.
Surgical Day Workflow
 ├── 1. Registration & Check-In (Verifying credentials & ID wristband placement)
 ├── 2. Pre-Op Holding (Gown change, vital checks, IV placement)
 ├── 3. Team Briefings (Meeting surgeon, anesthesiologist, & site marking)
 ├── 4. Anesthesia Delivery (General anesthesia + regional interscalene nerve block)
 ├── 5. Surgical Procedure (Joint access, bone preparation, component fixation)
 └── 6. PACU Recovery (Monitoring vitals, x-ray check, & pain management)
Check-In and Preoperative Care
Upon arrival, registration staff verify your identification, review consent paperwork, and place an ID wristband on your arm. You will be escorted to the preoperative unit, where nursing staff record your vital signs, confirm your last food/liquid intake, and place an intravenous (IV) line to deliver fluids and medications.
Meeting the Surgical and Anesthesia Teams
You will meet with your orthopedic surgeon and anesthesiologist prior to entering the operating room:
- Your Surgeon: Answers any final questions, reviews the surgical plan, and uses a surgical marker to sign the designated shoulder.
- Your Anesthesiologist: Discusses the anesthesia process. Most shoulder replacements are performed using general anesthesia (keeping you asleep) combined with an interscalene regional nerve block. This nerve block numbs the arm nerves, providing targeted pain relief for 12 to 24 hours after surgery.
The Surgical Procedure and PACU Recovery
You will be transferred to the operating room, where the surgical team positions your arm carefully. The surgeon makes an incision along the front of the shoulder, removes the damaged bone surfaces, prepares the bone shafts, and fixes the prosthetic implants securely using specialized bone cement or press-fit growth surfaces.
After the procedure (which typically takes 1.5 to 2.5 hours), you will be moved to the Post-Anesthesia Care Unit (PACU). Nurses continuously monitor your breathing, blood pressure, heart rate, and surgical dressing as the anesthesia wears off. Post-operative X-rays are taken to confirm component positioning.
What to Expect After Surgery
Understanding immediate post-operative protocols helps you participate actively in your recovery from day one.
Shoulder Sling Immobilization
Your surgical arm will be supported in a specialized shoulder sling (often featuring an abduction pillow) immediately following surgery. The sling maintains joint alignment and protects healing soft tissue structures. You will wear the sling continuously—including while sleeping—removing it only for designated physical therapy exercises or hygiene sessions as instructed by your surgeon.
Immediate Post-Operative Management
 ├── Joint Immobilization (Continuous sling & abduction pillow wear)
 ├── Multimodal Pain Control (Nerve blocks, oral analgesics, & cold therapy)
 ├── Early Passive Motion (Gentle pendulum & elbow/wrist/finger exercises)
 └── Surgical Site Care (Keeping incision dry, monitoring for redness/drainage)
Multimodal Pain Management
Modern joint replacement focuses on multimodal pain control—combining regional nerve blocks, oral anti-inflammatory drugs, targeted pain relievers, and cryotherapy (cold therapy units or ice packs). Controlling pain allows you to rest comfortably and participate effectively in early physical therapy.
Early Physical Therapy and Rehabilitation
Physical therapy begins shortly after surgery, often on the same day or the morning following the procedure. Initial movements focus on gentle passive range-of-motion exercises—such as pendulum swings and passive arm elevation guided by a physical therapist—alongside active movement of your fingers, wrist, and elbow to maintain circulation and prevent stiffness.
Recovery Timeline
Recovery after shoulder replacement is a multi-phase journey that unfolds over several months. While individual timelines vary based on age, overall health, rotator cuff integrity, and the specific surgical procedure performed, understanding common milestones can help set clear expectations.
Post-Operative Recovery Milestones
 ├── Phase 1 (Weeks 1–2): Acute Healing & Sling Protection
 │    ├── Strict sling wear; active finger, wrist, & elbow movement
 │    └── Gentle passive shoulder range-of-motion exercises
 ├── Phase 2 (Weeks 3–6): Early Active Range of Motion
 │    ├── Gradual weaning from sling (as approved by surgeon)
 │    └── Assisted active movements without lifting heavy weight
 ├── Phase 3 (Months 2–3): Progressive Strengthening
 │    ├── Resistance band training & rotator cuff / deltoid strengthening
 │    └── Resumption of light, non-impact daily home activities
 └── Phase 4 (Months 4–12): Advanced Function & Long-Term Recovery
      ├── Full integration of functional strength & endurance
      └── Return to low-impact recreational sports & activities
- Weeks 1 to 2: Focuses on surgical incision healing, pain management, and strict sling wear. Patients perform passive shoulder movements and active hand, wrist, and elbow exercises.
- Weeks 3 to 6: Passive range of motion is advanced, and active-assisted movements begin under physical therapy guidance. Sling wear is gradually reduced as advised by your orthopedic surgeon.
- Months 2 to 3: Focuses on active arm movement without assistance and light resistance strengthening using elastic bands. Patients gradually resume light, non-impact daily tasks around the home.
- Months 4 to 12: Focuses on advanced strength, endurance, and functional mobility. Patients continue home exercise programs and gradually return to low-impact recreational activities, such as swimming, gardening, or golf.
Possible Risks and Complications
While shoulder replacement surgery is an established and effective procedure, all surgical interventions carry inherent risks. Understanding potential complications helps you identify warning signs early and seek prompt medical attention.
- Surgical Site Infection: Bacterial infection can occur superficially in the skin incision or deep around the prosthetic components. Signs include increasing redness, swelling, warmth, severe pain, foul-smelling drainage, or fever.
- Deep Vein Thrombosis (DVT) and Blood Clots: Blood clots can form in deep arm or leg veins. Using prescribed blood thinners and engaging in early movement helps lower this risk.
- Shoulder Joint Stiffness: Excessive scar tissue formation can limit post-operative range of motion. Adhering to your prescribed physical therapy schedule minimizes long-term stiffness.
- Implant Loosening or Component Wear: Over time, artificial components can wear down or loosen from the bone, which may require revision surgery.
- Nerve or Blood Vessel Injury: Surrounding nerves (such as the axillary nerve) can occasionally experience stretch irritation during component positioning, causing temporary numbness or weakness in the arm.
- Prosthetic Instability or Dislocation: The artificial ball can shift out of its socket, particularly if early activity restrictions are violated while soft tissues are healing.
Contact your orthopedic team immediately if you observe signs of infection, sudden increases in pain, or arm numbness.
How to Choose the Right Orthopedic Hospital
Selecting an appropriate medical center for joint replacement surgery is an important decision that impacts your surgical care, safety, and rehabilitation experience.
                      ┌─────────────────────────────────────────┐
                      │   Hospital Evaluation Criteria          │
                      └────────────────────┬────────────────────┘
                                           │
         ┌─────────────────────────────────┼─────────────────────────────────┐
         ▼                                 ▼                                 ▼
┌──────────────────┐              ┌──────────────────┐              ┌──────────────────┐
│ Surgical Expertise│             │ Facility Power   │              │ Integrated Rehab │
├──────────────────┤              ├──────────────────┤              ├──────────────────┤
│• Board-certified │              │• Dedicated orthopedic│            │• On-site physical│
│  fellowship-     │              │  operating rooms │              │  therapy units   │
│  trained surgeons│              │• Advanced 3D CT  │              │• Comprehensive   │
│• High annual procedure│         │  imaging & guides│              │  pain management │
│  volumes         │              │• Low infection rates│           │• Structured      │
└──────────────────┘              └──────────────────┘              └──────────────────┘
Consider the following clinical priorities when evaluating healthcare facilities:
- Board-Certified, Fellowship-Trained Surgeons: Look for orthopedic surgeons who have completed specialized fellowship training dedicated to shoulder and elbow surgery or complex joint reconstruction.
- High Procedure Volumes: Medical centers that perform high volumes of total and reverse shoulder replacements typically report lower complication rates and more consistent outcomes.
- Advanced Surgical and Diagnostic Infrastructure: Choose hospitals equipped with 3D preoperative CT planning software, high-definition arthroscopic tools, and specialized joint replacement operating suites.
- Comprehensive On-Site Rehabilitation: Verify that the facility maintains an active, specialized physical therapy department experienced in post-arthroplasty recovery protocols.
- Structured Infection Control Protocols: Select centers with low reported surgical site infection rates and clear quality safety metrics.
Hospital Selection Checklist
Use this practical checklist when researching orthopedic hospitals and evaluating care options:
| Feature | What to Look For | Why It Matters |
| Surgeon Specialization | Fellowship training in shoulder and upper extremity surgery. | Guarantees advanced technical skill in total and reverse arthroplasty. |
| Advanced 3D Imaging | On-site 3D CT scanning and computer-guided surgical planning. | Enhances anatomical accuracy and implant positioning precision. |
| Orthopedic Operating Suites | Dedicated sterile joint suites with laminar airflow protocols. | Minimizes infection risks during prosthetic placement. |
| Specialized Physical Therapy | On-site physical therapists experienced in shoulder rehabilitation. | Ensures appropriate exercise progression and joint safety. |
| Pain Management Services | Multimodal pain control featuring regional interscalene nerve blocks. | Supports post-operative comfort and early physical therapy participation. |
| Structured Follow-Up Care | Scheduled post-op checkups, X-ray checks, and progress reviews. | Monitors long-term joint function and implant integration. |
How BESTORTHOHOSPITALS Helps Patients
Navigating joint replacement options and identifying qualified orthopedic centers can feel overwhelming. Platform resources help streamline your search and provide reliable, educational guidance.
- Hospital Discovery Tools: Access organized information about accredited orthopedic hospitals, joint replacement centers, and surgical clinics.
- Orthopedic Program Insights: Learn how leading medical centers structure their joint replacement departments, 3D imaging capabilities, and rehabilitation suites.
- Patient-Centered Education: Read clear, medically accurate articles explaining shoulder osteoarthritis, total versus reverse shoulder replacement, and recovery guidelines.
- Joint Care Resources: Explore educational content covering prehabilitation, physical therapy protocols, pain management, and home modification safety.
- Empowered Care Planning: Use practical checklists, surgical timelines, and diagnostic summaries to prepare for consultations and select facilities that meet your specific needs.
Common Mistakes People Make
Achieving a safe, successful joint replacement involves avoiding common preparation errors and post-operative oversights:
Common Joint Replacement Pitfalls
 ├── Failing to Disclose Herbal Supplements or Blood Thinners
 ├── Violating Preoperative Fasting Guidelines
 ├── Neglecting Home Safety & Caregiver Arrangements Before Surgery
 ├── Removing the Sling Early Without Surgeon Authorization
 └── Pushing Physical Activity Limits or Skipping Prescribed Therapy
Hiding or Forgetting Medications and Supplements
Failing to disclose over-the-counter herbal supplements or failing to adjust blood thinners as directed can increase intraoperative bleeding or interact with anesthetic drugs. Always provide a complete, written list of everything you consume.
Ignoring Preoperative Fasting Rules
Eating solid foods, drinking liquids, or chewing gum past your designated fasting deadline introduces severe anesthesia risks, which will force your surgical team to postpone your procedure.
Delaying Home Preparation Until After Surgery
Attempting to clear walkways, move heavy furniture, or cook meals with one arm immobilized in a sling after returning from the hospital leads to unnecessary joint strain and fall risks. Prepare your living space entirely before your surgery date.
Removing the Protective Sling Too Soon
Unbuckling or discarding your shoulder sling early without explicit authorization from your surgeon can place excessive tension on healing soft tissue repairs or dislodge newly placed prosthetic components.
Skipping Physical Therapy or Over-Exerting
Skipping prescribed rehabilitation sessions can lead to permanent joint stiffness and limited arm range of motion. Conversely, lifting heavy objects or pushing past pain thresholds too early can disrupt healing tissues and damage your joint implant.
Common Myths vs. Facts
Clearing up common misconceptions helps patients approach shoulder replacement surgery with clear, realistic expectations:
| Myth | Fact |
| Shoulder replacement is only for elderly individuals. | Eligibility depends on joint damage severity, pain, and failed conservative care, rather than age alone. |
| Reverse shoulder replacement is an outdated surgical technique. | Reverse shoulder replacement is an advanced, widely used procedure designed specifically for severe rotator cuff damage. |
| You can return to heavy lifting as soon as your incision heals. | Structural bone and soft tissue healing requires several months of progressive, guided physical therapy. |
| Physical therapy is optional if your surgical pain is well-controlled. | Structured physical therapy is essential to rebuild joint mobility, muscle strength, and functional coordination. |
| Preparation before surgery has no impact on post-op recovery. | Pre-op health optimization, home modifications, and prehab exercises directly support safer surgery and smoother recovery. |
Real-Life Educational Scenarios
Scenario 1: Preparing for Reverse Shoulder Replacement
A sixty-eight-year-old retired teacher with long-standing rotator cuff tear arthropathy experiences severe pain and an inability to lift their arm above chest height. After conservative treatments fail to provide relief, an orthopedic surgeon recommends reverse shoulder replacement. The patient completes pre-operative medical clearance, attends prehabilitation sessions to learn one-handed daily techniques, and sets up a comfortable recliner chair at home. Following surgery and a structured 4-month physical therapy program, the patient successfully regains pain-free arm elevation and daily function.
Scenario 2: Adapting the Home Environment for Single-Arm Safety
An active individual scheduled for total shoulder replacement spends the week before surgery organizing their living space. They set up a main-floor resting area, install a handheld shower head, stock pre-portioned meals, and move kitchen items to waist-height counters. Upon discharge from the hospital, the patient navigates their home space safely without straining their surgical arm.
Scenario 3: Adhering to Fasting for Anesthesia Safety
A patient scheduled for an early morning joint replacement receives strict instructions to stop all solid food and dairy at midnight. Despite waking up feeling thirsty, the patient adheres strictly to the instructions and avoids all liquids. The anesthesia team administers a regional nerve block and general anesthesia smoothly without airway complications.
Scenario 4: Benefiting from Structured Physical Therapy
Following successful shoulder replacement, a patient works closely with a physical therapist three times a week. During the first two weeks, the therapist guides gentle passive range-of-motion exercises while the arm remains supported in a sling. By week six, the patient transitions to active movements, gradually building arm strength through elastic band exercises and regaining the ability to reach comfortably into high cabinets.
FAQs (15 Questions)
1. What is shoulder replacement surgery?
Shoulder replacement surgery (shoulder arthroplasty) is an orthopedic procedure in which damaged or arthritic joint surfaces of the shoulder are replaced with prosthetic components made of medical-grade metal and durable plastic.
2. What is the difference between total and reverse shoulder replacement?
Anatomical total shoulder replacement replicates natural anatomy by placing a metal ball on the humerus and a plastic socket on the shoulder blade. Reverse shoulder replacement switches these positions—attaching the ball to the shoulder blade and the socket to the humerus—allowing the deltoid muscle to lift the arm when rotator cuff tendons are severely damaged.
3. How long does shoulder replacement surgery usually take?
The surgical procedure typically takes between 1.5 and 2.5 hours, though additional time is required for preoperative preparation and post-anesthesia recovery monitoring.
4. How should I prepare my home for recovery?
Set up a comfortable sleeping area with a recliner chair or supportive wedge pillows, clear walking paths of fall hazards, place daily essentials at waist height on your un-operated side, pre-cook single-portion meals, and arrange for caregiver assistance.
5. Why must I fast before surgery?
Fasting empties stomach contents so that under anesthesia—when normal upper airway reflexes are relaxed—stomach contents cannot rise into the throat and enter the lungs (aspiration).
6. Should I stop my regular medications before surgery?
Certain medications (such as blood thinners, NSAIDs, and specific supplements) must be paused prior to surgery to minimize bleeding risks. Always follow the specific medication schedule provided by your surgical team.
7. What items should I bring to the hospital?
Bring a government ID, insurance cards, a written medication list, loose-fitting front-buttoning clothing, non-skid slippers, personal mobility aids, and protective cases for eyeglasses or hearing aids.
8. Will I need to wear a sling after surgery?
Yes. You will wear a specialized shoulder sling continuously for approximately 2 to 6 weeks following surgery to protect healing soft tissues and support joint alignment.
9. Is physical therapy necessary after shoulder replacement?
Yes. Structured physical therapy is essential to rebuild joint mobility, restore arm strength, improve coordination, and support long-term functional recovery.
10. How long will I need caregiver help at home?
Most patients require daily caregiver assistance for at least the first 1 to 2 weeks after returning home to help with dressing, bathing, preparing meals, and managing ice applications.
11. When can I drive again after shoulder replacement surgery?
Driving is generally restricted for at least 4 to 8 weeks after surgery, or until you are no longer wearing a sling, have stopped taking prescription pain medications, and have regained sufficient control of your arm as approved by your surgeon.
12. What potential risks are associated with shoulder replacement?
Potential risks include surgical site infection, blood clots, joint stiffness, implant loosening, nerve irritation, or prosthetic instability. Following post-operative instructions minimizes these risks.
13. What is prehabilitation, and how does it help?
Prehabilitation involves engaging in guided exercises and education prior to surgery. Prehab strengthens surrounding muscles, improves core stability, and teaches single-arm daily techniques, supporting a smoother post-operative recovery.
14. How do I choose the right orthopedic hospital?
Look for medical centers with board-certified, fellowship-trained shoulder surgeons, high procedure volumes, advanced 3D CT imaging platforms, dedicated joint replacement operating suites, and specialized physical therapy services.
15. How does BESTORTHOHOSPITALS help patients preparing for shoulder replacement?
BESTORTHOHOSPITALS provides educational articles, hospital discovery tools, and orthopedic guidance to help patients locate qualified surgical facilities, understand joint replacement procedures, and prepare effectively for recovery.
Final Thoughts
Preparing for shoulder replacement surgery is a structured process that requires time, clear communication, and proactive home planning. While joint replacement is a major procedure, taking steps to optimize your physical health, adjust medications, arrange caregiver support, and modify your living space empowers you to approach your surgery date with confidence.Partnering closely with your orthopedic surgeon, anesthesiologist, and physical therapist ensures that your surgical plan is tailored to your unique anatomical needs. Combining surgical care with structured physical therapy and healthy daily habits offers a clear pathway toward restoring pain-free shoulder function and regaining physical independence.